 Polly3D Documentation
Plugin parameters
Every parameter of the Polly3D effect, group by group, with ranges and defaults.
Names are exactly as shown in the Effect Controls panel. Ranges are the slider's valid range; defaults are in parentheses.
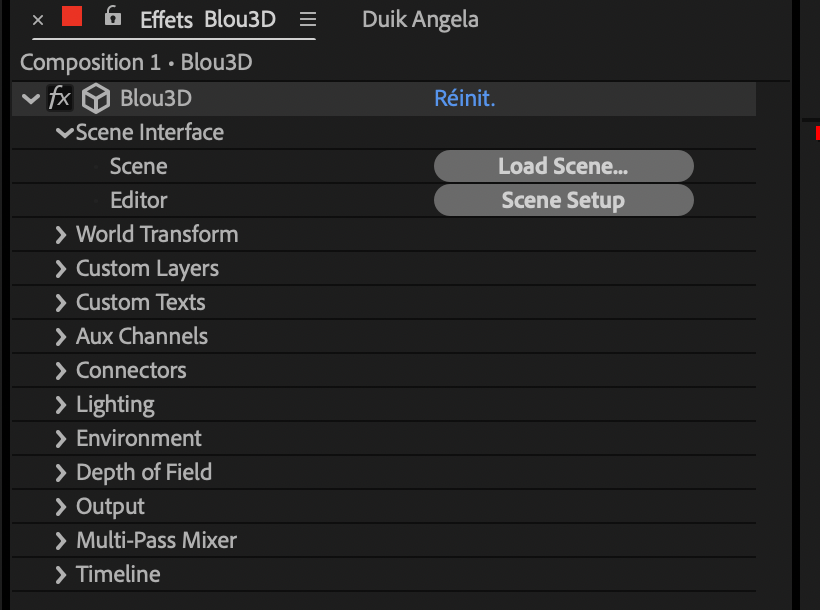
Scene Interface#
At the very top of the effect, above the groups, the Refresh Scene button reads the scene file again and renders again; the name of the scene (its file name, with the extension) is written on its left, or No scene while none is loaded. Use it when you changed the file from somewhere else than Studio.
| Parameter | Meaning |
|---|---|
| Load Scene… | Loads a .polly file into the effect |
| Scene Setup | Opens the scene in Polly3D Studio. On a new effect the scene file is not created yet: Studio creates it the first time you save, so no empty scene is left behind. When you save in Studio, the effect refreshes |
An internal, hidden counter (Refresh Counter (auto)) is incremented by Studio at each save to invalidate After Effects' cache. Do not touch it.
World Transform#
Transforms the whole scene as a block.
| Parameter | Range (default) | Meaning |
|---|---|---|
| World Null (button Create Null + Link) | Creates a 3D null named Polly3D World at the scene origin and links World Position, World Scale and World Rotation to it with expressions: moving, scaling or rotating the null moves the whole scene | |
| World Position | 3D point (0, 0, 0) | Offset of the scene, in pixels |
| World Scale | 0.001–1000 (1) | Uniform scale of the scene |
| World Rotation X / Y / Z | angles (0°) | Rotation of the scene |
| Unit Size (px) | 1–10000 (100) | Number of pixels per editor unit. A 1.6-unit cube is 160 px by default |
Aux Channels#
Eight channels, Aux Channel 1 to 8. Each contains:
| Group / parameter | Range (default) | Meaning |
|---|---|---|
| Aux N Null (button Create Null + Link) | Creates a 3D null linked to the channel | |
| AuxN Position | 3D point (0, 0, 0) | Adds to the object's position (pixels) |
| AuxN Size X / Y / Z | −1000–1000 (1) | Scale factors: 1 leaves the size unchanged |
| AuxN Rotation X / Y / Z | angles (0°) | Adds to the object's rotation |
| AuxN Opacity | 0–100 % (100 %) | Opacity of the object |
| AuxN UV Offset X / Y | −100–100 (0) | Scrolls the texture of the object |
| Cloner | 20 sliders | Count, Count X / Y / Z, Spacing X / Y / Z, Offset X / Y / Z, Rotation X / Y / Z, Scale X / Y / Z, Radius, Start Angle, End Angle, Path Offset — added to the cloner numbers |
| Random | 9 sliders | Strength, Move X / Y / Z, Rotation X / Y / Z, Scale, Seed |
| Noise | 11 sliders | The Random ones plus Speed, Frequency |
| Step | 10 sliders | Strength, Move, Rotation, Scale, From, To |
| Spline | 4 sliders | Strength, Path Offset, Speed, Spread |
| Delay | 2 sliders | Strength, Delay |
| Image | 3 sliders | Strength, Scale, Size |
| Bounce | 3 sliders | Strength, Drop Height, Start |
| Spring | 3 sliders | Strength, Scale, Start |
| Twist | 2 sliders | Strength, Angle |
| Bend | 3 sliders | Strength, Angle, Direction |
| Taper | 2 sliders | Strength, Amount |
| Wave | 3 sliders | Strength, Amplitude, Phase |
| Displace | 2 sliders | Strength, Amount |
| Wind | 1 slider | Strength |
| Explode | 6 sliders | Strength, Size, Random Rotation, Displace, Scatter, Position Noise |
An Aux Channel only shows what the scene uses. Channels that no object is bound to are hidden, and so are the groups of effectors that none of the objects of the channel holds (the group Control stays). Inside a group, only the sliders the object uses are shown: the Cloner shows the numbers of its pattern (a Grid has no Radius, a Radial has no Spacing). The effect reads this from the scene file, so it follows the editor after each save or a click on Refresh Scene. With no scene, or a scene that cannot be read, all of it is hidden. The simulations (Rigid body, Collider, Cloth) have no group: they run from the scene alone.
See Aux channels.
Connectors#
Connector 1 to 16: free sliders (−1,000,000 to 1,000,000, default 0). Studio links values to them; they are added to the values of the editor. Connector 1 is always shown; the others appear only when something in the scene is linked to them (and are hidden when there is no scene). See Connectors.
Lighting#
| Parameter | Range (default) | Meaning |
|---|---|---|
| Scene Ambient | 0–1000 % (100 %) | Multiplies the scene's ambient light |
| Scene Lights Influence | 0–1000 % (100 %) | Strength of the lights stored in the scene |
| AE Lights Influence | 0–1000 % (100 %) | Strength of the After Effects lights added on top |
Environment#
| Parameter | Range (default) | Meaning |
|---|---|---|
| Environment Intensity | 0–10 (1) | Strength of the sky / environment lighting and reflections |
| Show in Background | off | Shows the environment behind the scene |
| Rotate Environment X / Y / Z | angles (0°) | Rotates the environment |
Depth of Field#
| Parameter | Range (default) | Meaning |
|---|---|---|
| Enable | off | Turns the blur on |
| Use AE Camera | off | Reads Focus Distance and Blur Level from the composition camera |
| Focus Distance (px) | 1–100000 (1000) | Distance that is sharp |
| Blur Level | 0–1000 % (100 %) | Strength of the blur |
Custom Textures#
Custom Texture 1 to 8: layer pickers. A Texture, Matcap or Environment layer in your materials can display one of these layers. See Custom layers and texts.
Custom Texts#
Custom Text 1 to 10: text layer pickers. Text objects in Studio extrude these layers into 3D text.
Output#
| Parameter | Default | Meaning |
|---|---|---|
| Composite on Layer | on | Composites the scene on the layer |
| Layers Below Interact | off | Makes the layer an adjustment layer so glass and reflections see what is below |
| Camera Cut-off > Disable Cut-off | off | Turns the near/far clipping off |
| Camera Cut-off > Near Distance (px) | 100 | Nearest distance drawn (0.5–100000) |
| Camera Cut-off > Far Distance (px) | 40000 | Farthest distance drawn (1–1000000) |
Depth Matte#
The Depth Matte folder of the Output group turns the layer into a black and white matte tied to a plane of the 3D world: white in front of the plane (on the camera side), black behind it, black where there is nothing. Use it as a Luma Inverted track matte on a layer below, so that this layer seems to cut through the objects of the scene, and stays in place when the camera moves. Duplicate the Polly3D layer: the copy shows the matte, the original shows the scene.
| Parameter | Default | Meaning |
|---|---|---|
| Show Depth Matte | off | The layer shows the matte instead of the scene (it is not laid over the layer below, and no effect is applied to it) |
| Matte Position | 0, 0, 0 | A point of the plane, in comp pixels like the Aux channels. Link it to a null |
| Matte Rotation X / Y / Z | 0° | Turns the plane (at 0° it faces the camera of the composition, along the Z axis) |
| Face Camera | off | The plane always faces the camera, like a Z-depth matte that stays fixed in the scene |
| Matte Expansion (px) | 0 | Moves the edge of the matte in depth: positive makes the white zone grow |
| Matte Feather (px) | 0 | Width of the transition between black and white |
| Feather Both Sides | off | The transition is centred on the edge, not only in front of it |
| Matte Gamma | 1 | Brightens or darkens the grays of the transition |
| Invert Matte | off | Swaps black and white |
| Invert From Back | off | Swaps black and white when the camera is behind the plane, so the matte works from both sides |
| Invisible From Back | off | The matte is black when the camera is behind the plane |
| Preserve Alpha | off | The background (where the scene draws nothing) is transparent instead of black |
See Output modes.
Multi-Pass Mixer#
Each is 0–400 % (100 %): Diffuse, Specular, Ambient Lighting, Reflectivity, Illumination, Shadows Mix. They rebalance the lighting components of the whole scene without touching the materials: for instance, lower Specular to calm highlights, raise Illumination to boost emissive materials, or lower Shadows Mix to lift the shadows.
Timeline#
| Parameter | Range (default) | Meaning |
|---|---|---|
| Play Timeline | on | When on, the scene clock plays with the composition. When off, the clock stays at Time Offset, so you animate Time Offset yourself to drive the scene |
| Time Offset (s) | −86400–86400 (0) | Shifts the clock, in seconds |
| Time Speed | −1000–1000 % (100 %) | Speed of the clock; negative values play backwards |